A practical U.S. guide to restoring cloudy headlights, protecting the lens afterward, and knowing when replacement is the smarter move.
| THE 30-SECOND VERDICT Yes. Headlight restoration works when the cloudiness is on the outside of a plastic lens and is caused by oxidation, UV damage, light scratches, or failed surface coating. It can make the lens dramatically clearer and improve usable light output. It cannot repair cracks, failed seals, internal moisture, burned reflectors, electrical faults, or heavily damaged projector optics. |
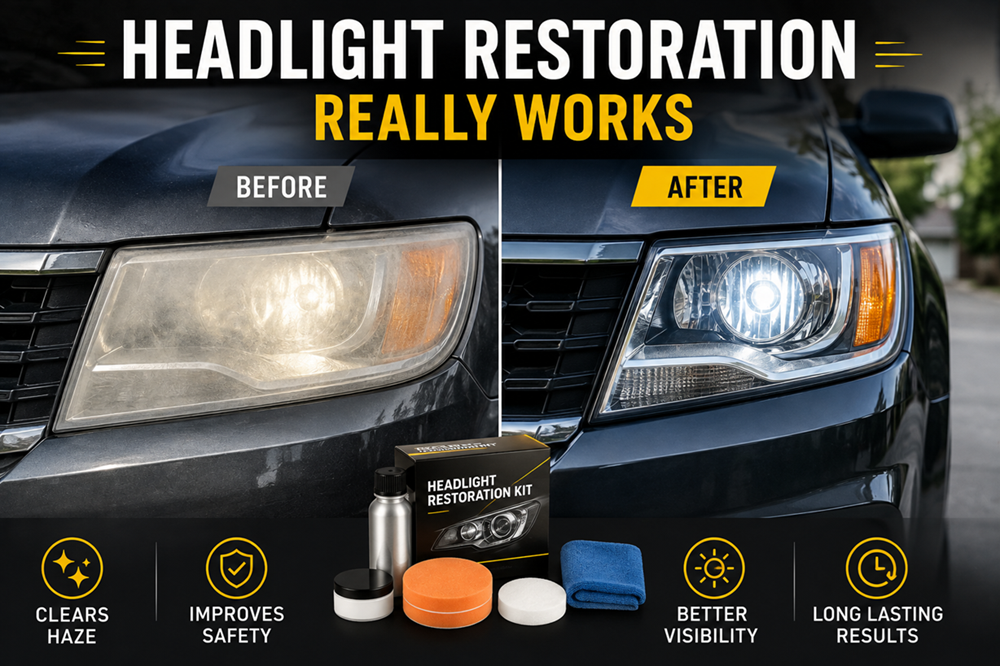
If you are asking whether headlight restoration really works, the answer depends less on the brand of kit and more on what is wrong with the headlight. Most modern headlight lenses are polycarbonate plastic. Sunlight, road grit, heat, chemicals, and time gradually damage the factory protective layer. The surface can turn yellow, milky, or hazy, which scatters light that should be projected onto the road.
That is the type of damage restoration is designed to address. A proper process removes the degraded outer layer, refines the sanding marks, polishes the plastic, and ideally adds new UV protection. The result can be a major visual improvement, but it is important to understand that “looks clear” and “performs exactly like a new headlight assembly” are not the same thing.
Key Takeaways
- Headlight restoration works best on exterior yellowing, haze, oxidation, and light surface damage on plastic lenses.
- AAA testing found severely deteriorated headlights produced only about 22% of the light output of new headlights, while restoration brought output back to roughly 70% in its test.
- Sanding and polishing without durable UV protection can look impressive at first but may allow the lens to oxidize again relatively quickly.
- Restoration will not solve condensation inside the housing, cracked lenses, failing seals, damaged reflectors, weak bulbs, wiring problems, or misaligned headlights.
- If the lens is structurally sound, restoration is usually worth trying before replacing an expensive headlight assembly.
Before You Buy a Kit: Is the Damage Outside or Inside?
Run this simple diagnosis first. Wash and dry the headlight, then inspect it in daylight with the lights switched off.
| What You See | Likely Cause | Will Restoration Help? |
| Yellow or chalky film on outer surface | UV oxidation / failed outer coating | Usually yes |
| Fine scratches and dullness | Road abrasion / weathering | Often yes |
| Clear lens when wet, hazy when dry | Surface micro-scratches / oxidation | Usually yes |
| Water droplets or fog inside housing | Seal or vent problem | No, housing repair is needed |
| Crack, hole, missing plastic | Physical damage | No, replace or repair assembly |
| Lens clear but beam still weak | Bulb, reflector, projector, voltage, or aim issue | Probably not |
How Much Difference Can Restoration Actually Make?
The safety case for fixing cloudy lenses is stronger than the cosmetic case. In laboratory testing, AAA compared deteriorated headlamps from older vehicles with new replacement assemblies. The clouded low-beam headlights delivered only about 22% of the light output of new headlights. Professional and DIY restoration improved output to roughly 70% in that test, while new original-equipment assemblies restored output to the reference level.
You can read the testing summary in AAA’s cloudy-headlight research. The important takeaway is that restoration can recover a substantial amount of lost performance, but an old restored assembly may still not match a completely new OEM unit.
Car and Driver’s updated 2026 kit testing points in the same practical direction. Its testers used visibly oxidized headlights, compared multiple restoration methods, and then left treated lights exposed outdoors for six months to judge durability. The testing showed that both manual and more aggressive sanding systems can produce strong visual results when used on the right level of oxidation.
See the current Car and Driver headlight restoration kit test for its June 2026 results and six-month follow-up images.
Why Does Sanding a Headlight Make It Clearer Instead of Ruining It?
Because the yellowed material is usually the damaged surface layer. The goal is not to grind deeply into the lens. It is to remove the oxidized coating and a very small amount of weathered plastic in controlled stages. Coarse abrasives level the damaged layer, finer abrasives reduce the sanding marks, and polishing restores optical clarity.
That is why an incomplete job often looks worse halfway through. After the first sanding stage, the lens may look uniformly frosted. That can be normal. Clarity returns only after the progressively finer steps and the finishing treatment are completed.
What role does the UV coating play?
It is one of the most important parts of long-term results. The factory lens has UV protection because bare polycarbonate does not tolerate years of sun exposure well. Restoration removes some or all of the failed original surface protection along with the oxidation. A suitable protective coating or protectant helps slow the next cycle of yellowing.
For example, Sylvania’s restoration instructions specifically finish the process with a UV-block clear coat after sanding and polishing.
Restore, Repair, or Replace? Use This Decision Path
RESTORE when the lens itself is the problem
- The outside surface is yellow, cloudy, chalky, or mildly scratched.
- The housing is dry inside and the lens is not cracked.
- The beam pattern looks normal but appears dimmer through the cloudy lens.
- The assembly is expensive enough that trying a low-cost restoration first makes sense.
REPAIR when the housing has another fault
- Condensation repeatedly forms inside the light.
- A rear cap, vent, gasket, or seal is missing or damaged.
- The headlight aim is incorrect even though the lens is clear.
- The bulb connector, wiring, ballast, LED driver, or other electrical component is failing.
REPLACE when restoration cannot recover safe function
- The lens is cracked, deeply crazed, warped, or heat-damaged.
- Reflective surfaces inside the assembly are burned or deteriorated.
- A projector lens or internal optical component is damaged.
- Repeated restoration has left the outer lens heavily worn or uneven.
- The restored beam remains weak or produces a poor pattern after bulb and aim checks.
Which Type of Restoration Works Best for Each Level of Haze?
| LIGHT HAZE | Try a mild polishing or light-abrasive system. This is appropriate when the lens is only beginning to look dull and the factory surface has not failed badly. |
| MODERATE OXIDATION | Use a multi-step kit that includes sanding, refining, polishing, and a protective finishing step. This is where restoration usually offers the best cost-to-result ratio. |
| HEAVY YELLOWING | A more aggressive wet-sanding or drill-assisted system may be needed. Take extra care around edges and body paint. If the plastic is deeply cracked or crazed, replacement may be a better answer. |
What Does a Proper DIY Restoration Process Look Like?
Always follow the instructions supplied with your specific kit. The steps and curing times can differ. In general, a thorough restoration follows this sequence:
- Clean the lens thoroughly so dirt is not dragged across the surface.
- Mask the paint and trim around the headlight. Sanding discs and chemical coatings can damage nearby finishes.
- Remove the failed outer layer using the abrasive grade specified by the kit.
- Refine the surface with progressively finer abrasives until the scratches are uniform and very fine.
- Polish or apply the kit’s clarity-restoring step.
- Apply the specified UV protectant or clear coating if the system includes one.
- Allow the coating to cure for the full stated time before exposing it to rain, washing, or heavy moisture.
- After dark, verify that both headlights illuminate evenly and that the beam aim is still correct.
Why Do Some Restored Headlights Turn Yellow Again So Quickly?
The restoration may have removed the oxidation but failed to replace enough protection. Sun exposure is relentless, especially on vehicles parked outdoors in high-UV areas. Heat, road chemicals, abrasive washing, and environmental exposure can accelerate deterioration too. The durability of any restoration therefore depends on preparation, the finishing system, climate, parking conditions, and how aggressively the lens was sanded.
There is no universal lifespan that applies to every restoration. Some results can remain acceptable for years, while poorly protected lenses may haze again much sooner. If your kit includes a coating, follow its cure instructions exactly. If it does not, use only a protectant specifically compatible with automotive polycarbonate lenses rather than improvising with household clear coats.
What Common DIY Mistakes Reduce the Results?
Stopping after polishing: Polish can make the lens look clear immediately, but the surface still needs protection from renewed UV damage.
Skipping grit stages: Jumping too quickly from coarse sanding to polish can leave visible scratches, distortion, or haze.
Using too much drill speed or pressure: Excess heat or uneven removal can damage plastic and create low spots.
Poor masking: Sanding the edge of a painted fender or bumper can turn a cheap project into a body-repair bill.
Restoring the wrong problem: No amount of exterior polishing can remove moisture trapped inside a sealed housing.
Ignoring beam aim: A clear lens does not guarantee that the headlight is pointed correctly. Improper aim can reduce visibility or glare other drivers.
DIY Restoration vs. Professional Service vs. Replacement
| Option | Best For | Main Advantage | Main Limitation |
| DIY kit | Surface oxidation on otherwise healthy lenses | Lowest cost and convenient | Results depend heavily on technique |
| Professional restoration | Severe oxidation or owners who do not want to sand | Better tools and more consistent process | Still may not equal a new assembly |
| Headlight replacement | Cracked housing, damaged optics, failed seals, or poor restored performance | Restores the entire assembly, not just the surface | Usually the highest cost |
Is Headlight Restoration Worth It in 2026?
For the right headlight, usually yes. A restoration kit costs far less than many complete modern headlight assemblies, especially LED and adaptive units. If the housing and optics are healthy and the failure is limited to the outer lens, restoration is one of the most cost-effective ways to improve both appearance and nighttime visibility.
The best way to think about it is as surface rehabilitation, not a permanent reset to factory-new condition. A careful restoration can recover substantial clarity and useful light. A new assembly remains the benchmark when the headlight has deeper optical, structural, or sealing problems.
Frequently Asked Questions
Does toothpaste really restore headlights?
It may temporarily clean very light surface film because some toothpastes are mildly abrasive, but it is not a complete restoration system and does not properly replace the lens’s UV protection. For oxidized lenses, a purpose-built automotive process is the better option.
Can WD-40 make cloudy headlights clear?
It can make a lens look darker and clearer for a short time because the oily film changes how light reflects from the surface. It does not remove the damaged plastic layer or provide a durable restoration.
Can restoration fix headlights that are foggy on the inside?
No. Internal fogging or water droplets point to a housing seal, vent, cap, or physical-damage problem. The housing must be dried and the source of moisture corrected.
Will restoring headlights make them brighter?
If lens haze is blocking and scattering light, restoring clarity can improve the amount of usable light reaching the road. AAA’s testing found a meaningful improvement after restoration, though it did not fully match new OEM headlamps.
Can LED headlights be restored?
The outer polycarbonate lens on many LED headlight assemblies can be restored if the damage is external. Restoration does not repair failed LED modules, drivers, internal optics, or sealed electronic components.
How do I know if I should stop restoring and replace the assembly?
Replacement becomes the stronger choice when the lens is cracked or deeply crazed, moisture keeps returning, reflectors or projectors are damaged, electrical components are failing, or the beam remains weak or distorted after proper restoration and aim checks.
Bottom Line
So, does headlight restoration work? Yes, when the problem is an oxidized or weathered outer lens. It can transform appearance and recover a significant portion of lost light output without the cost of replacing the entire assembly. The strongest results come from matching the restoration method to the severity of the damage and protecting the lens after the degraded surface has been removed.
If the cloudiness is inside the housing, the lens is cracked, or the beam remains weak despite a clear outer surface, stop treating it as a cosmetic problem. Have the headlight assembly, bulb or LED system, wiring, seals, and aim inspected. That distinction is what separates a successful restoration from money spent polishing a problem that sanding cannot fix.